Category: General Help

FPM Migration from PHP 5.2 to PHP 5.3

Some installation/configuration notes we came up with whle integrating PHP 5.3 into our standard deployment system:

Compile options
PHP 5.3 has FPM inbuilt now, so there’s no longer any need to apply diffs to the source, but you DO still have to specify “–enable-fpm”.  All other FPM parameters have been depreciated now (except the run as user/group ones – but we use chrootuid anyway).  That’s all that’s required for compilation.

Configuration
Things have changed significantly here, from an XML format into an ini format.  Here’s a typical fpm.ini that we’re using:

[global]
pid = /var/log/php-fpm.pid
error_log = /var/log/php-fpm.log
log_level = notice

emergency_restart_threshold = 10
emergency_restart_interval = 1m
process_control_timeout = 5s
daemonize = yes

[www]
;this is the IP/port to listen for fastcgi requests on
listen = 127.0.0.1:41493
listen.backlog = 1024
listen.allowed_clients = 127.0.0.1
; not sure if we need to specify user/group here, but it’s indicated it is required, but if we chrootuid php so it’s already running as another use, it seems to be ignored
user = nobody
group = nobody

; This stuff actually works in PHP 5.3 – and works well!!
pm = dynamic
pm.max_children = 3
pm.start_servers = 1
pm.min_spare_servers = 1
pm.max_spare_servers = 1
pm.max_requests = 500

request_terminate_timeout = 40s
request_slowlog_timeout = 300s
slowlog = /var/log/php-fpm.log.slow
rlimit_files = 2048

rlimit_core = 0
catch_workers_output = no


Runtime
Things have changed here slightly too, we used to run:

bin/php-cgi –fpm

and php would load up the compile-time default configuration file.

With 5.3, please note that the binary to run has changed and moved – it’s in the sbin directory and is called php-fpm. We also have to pass in the fpm configuration ini file as a parameter (as there wasn’t a compile time option for this anymore):

sbin/php-fpm –fpm-config=/conf/php-fpm.ini


And that’s it. We’ve also tested out the dynamic process spawning as this was of most interest to us as on shared servers RAM is like gold! Seems to work well – it seems to guage the necessity for additional processes by whether it has to wait for a request to be served. It seems to drop off unused processes after 10 seconds or so – couldn’t find anything about this so I guess it’s just some magical internal algorithm, but from my tests it looks to work and work well.
SSL Certificate 2048 bit generation with OpenSSL

openssl req -nodes -newkey rsa:2048 -keyout www.examplewebsite.com.key -out www.examplewebsite.com.csr

You'll be prompted for a series of questions:
Country Name (2 letter code) [GB]:AU
State or Province Name (full name) [Berkshire]:New South Wales
Locality Name (eg, city) [Newbury]:Sydney
Organization Name (eg, company) [My Company Ltd]:Example Company
Organizational Unit Name (eg, section) []:
Common Name (eg, your name or your server's hostname) []:www.examplewebsite.com
Email Address []:

Please enter the following 'extra' attributes
to be sent with your certificate request
A challenge password []:
An optional company name []:

You then upload the contents of the www.examplewebsite.com.csr file to your SSL certificate registrar and they'll send you back your certificate file.  You can then plug these into your favorite webserver/application server.

sysctl.conf and other settings for high performance webservers


There’s a couple of key settings on CentOS servers that significantly helps for high performance web servers that we always put in by default across all of our managed machines:

  • net.ipv4.tcp_syncookies = 1
    While it’s more commonly seen by people wanting to prevent denial of service attacks from taking down their websites, some people don’t realise that a heavy traffic site is not much different from one that is under a constant denial of service!
  • net.ipv4.netfilter.ip_conntrack_max = 300000
    Netfilter under linux does a great job, but it can sometimes be artificially restricted by some OS limitations that try to prevent some traffic from taking up too many system resources.  This is one of those settings that I feel is often set too low.  We ramp it up to 300,000 which means NetFilter can track up to 300,000 “sessions” (such as a HTTP connection) at one time.  If you’ve got 10,000 people on your website at once, you’ll definitely want to adjust this one!
  • net.ipv4.tcp_max_syn_backlog = 10240
    An application such as Nginx is very capable of serving as many TCP connections as an operating system and hardware can handle.  With that said, there will be a backlog of TCP connections ins a pending state before the user-space application such as Nginx gets to call accept().  The key here is to make sure the backlog of unaccepted TCP connections never exceeds the above number else there will be the equivalent of packetloss of the connection packets, and some clients will experience delays, if not a complete outage.  We find 10240 is a high enough number for this on current modern day servers.
  • net.core.netdev_max_backlog = 4000
    This one is important, particularly for servers that operate past 100MBit/s.  It governs how many packets will be queued inbetween the kernel processing the interface packet queue.  At gigabit speeds on busy servers, seeing the queue exceed the default of 1000 is pretty common.  We usually put this up to 4,000 for web servers.
  • kernel.panic = 10
    While unrelated to performance, there’s nothing worse on a busy web server than seeing a kernel panic.  While this isn’t common, when you do push a server to it’s limits, you can certainly come across kernel panics more commonly than you might otherwise, and this setting just helps reduce downtime on production servers.

We usually also change the TCP congestion control algorithm too by adding the following to rc.local:

  • /sbin/modprobe tcp_htcp

You will also want to increase the send queue on your interface by adding the following to your rc.local (you’ll want to change eth0 to your interface name):

  • /sbin/ifconfig eth0 txqueuelen 10000

There’s a lot of commentary online about changing tcp memory buffers and sizes.  Personally I haven’t found them to make much difference on a suitably spec’d server.  One day I might get around to having a look at how these affect performance, but for now, the above settings are known to achieve gigabit HTTP serving speeds for our webservers so that’s good enough for me!


Nginx location and rewrite configuration made easy

Okay guys, so as many of you know, we offer both Apache and Nginx servers here as part of our standard shared hosting packages. There is no better web server out there for reliable performance in a high-traffic environment. One thing that I frequently go through with the new staff here are nginx location / rewrite rules because they can be a bit confusing.

The best way to think of things is that as a request comes in, Nginx will scan through the configuration to find a “location” line that matches the request. There are TWO modes that nginx uses to scan through the configuration file: literal string matching and regular expression checks. Nginx first scans through ALL literal string location entries in the order that they occur in the configuration file, and secondly scans through ALL the regular expression location entries in the order that they occur in the configuration file. So be aware – location ordering order DOES matter.

Now there’s a few ways of interrupting that flow:

location = /images { } (Note: does not work for regular expressions)
The “=” is the important character here. This matches a request for “/images” ONLY. This also halts the location scanning as soon as such an exact match is met.

location ^~ /images {} (Note: does not work for regular expressions)
The “^~” results in a case sensitive match for the beginning of a request. This means /images, /images/logo.gif, etc will all be matched. This also halts the location scanning as soon as a match is met.

location ~ /images {}
location ~* /images {} (case insensitive version)
This causes a case (in-)sensitive match for the beginning of a request. Identical to the previous one, except this one doesn’t stop searching for a more exact location clauses.

That’s IT! Yes it really is that simple. Now there’s a few variations for case-insensitive matches or named-locations, but don’t worry about those for now.

Now all of the above examples are literal string examples. If you replace /images with a regular expression then suddenly you have altered the order of the rules (remember ALL literal strings get checked first, and THEN regular expressions – regardless of the order you have them in your configuration).

An examples of a regular expression match is:

location ~ \.(gif|jpg|jpeg)$ { }
This will match any request that ends in .gif, .jpg, or .jpeg.

So now that we’ve discussed the foundations of the location rules, we can move into rewrites. There are TWO kinds of rewrites – URL redirects (HTTP301/HTTP302), or an internal rewrite (mangles the request before it is processed).

URL Redirects are the simplest to understand:

location /admin {
rewrite ^/admin/(.*)$ http://admin.example.com/$1 permanent;
}

This example will redirect any request matching the location rule (see earlier) as a HTTP 301 permanent redirection to http://admin.example.com/. e.g. http://www.example.com/admin/index.html now gets HTTP redirected to http://admin.example.com/index.html. Note the regular expression and the $1 replacement in the URL. If you want the redirect to be a HTTP 302 (temporary redirection), just change the word “permanent” to “redirect”.

Internal rewrites are a little more complicated:

location /admin {
rewrite ^/admin/(.*)$ /$1 break;
}

The key word here is “break”. This causes the rewrite processing to stop. If this word was “last”, it would then go back to scanning location entries as per our discussions earlier – but now with the rewritten URL.

I hope that clears up nginx configuration. The documentation is really good over at the nginx wiki (http://wiki.nginx.org/NginxModules). I think this was the only part that sometimes confuses some of us here. let us know if you think I missed anything, otherwise I hope to put up some of our nginx rewrites for some o the more popular forums/blogs in the weeks to come!

New RackCorp option in the ongoing fight against spam

We have now added a new option in the ongoing fight against unwanted spam.  As of early this morning, all RackCorp mail servers in Australia, US, and Canada have been updated to RackCorpMailServices-1.14.  In doing do, we have now included a new option in our online portal to help manage spam.

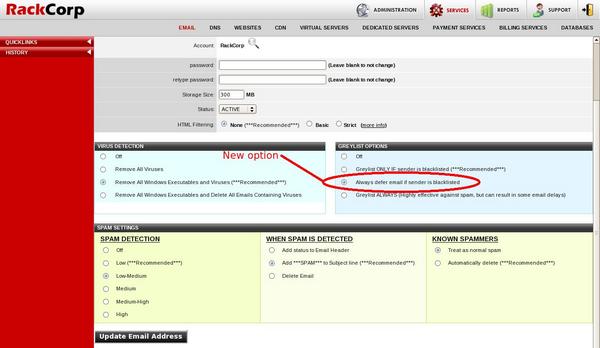
You can find the option here when managing accounts (and similarly for managing aliases):

Spam Defer on RBL

With this option, you can now effectively defer ALL inbound email that matches the realtime blacklists.  Up until now, you only were able to greylist (defer for 10 minutes) any inbound email matching these blacklists.  By permanently deferring the email, you ensure that you do NOT receive any email that is coming from a blacklisted source, AND that the sender will eventually receive notification that you did not receive that email (explaining that it is because they are blacklisted).

It’s not all good though – the downside to doing this is that if someone IS blacklisted and is sending you something urgent, then they might not find out about it for several days.  Exactly how long until they do find out varies between 4 hours and 10 days, and is dependent on the sender’s ISP / mail infrastructure (not ours!).

When do we recommend using this option?  If you’re receiving so much spam that you’re finding it hard to do business, then activate this option – it’ll help a lot.